How to Fix Computer Slowness in 7 Easy Steps!

Computer slowness is one of the most common issues that computer users face when interacting with their devices every day. Computer slowness may sound difficult to fix, but it is easier than you think! First off, it’s important to understand when exactly you are experiencing slowness. Are you experiencing slowness while your computer is booting up? How about slowness only in a browser? Maybe just a specific application or just general computer slowness? Whatever the issue may be, we are able to assist you with the steps below!

1. Reboot Your Computer
The very first thing you should do is reboot your computer. This is the easiest solution and is sometimes overlooked. Rebooting your device resolves a host of problems and errors that you may be experiencing. Think of it like this, YOUR COMPUTER NEEDS REST too. Imagine for a second that you have been up working as hard as you can for 6 days straight or even 6 months. You would be cranky as well, yelling and frustrated! Your device is no different and needs to be shut off from time to time so that updates can be pushed and that hardware can reset (inside the pc). We recommend that if your device has been running for a week, it should be rebooted.
Steps to be performed: Navigate to the Start Menu > Power icon > Shut Down
- Windows 11

- Windows 10
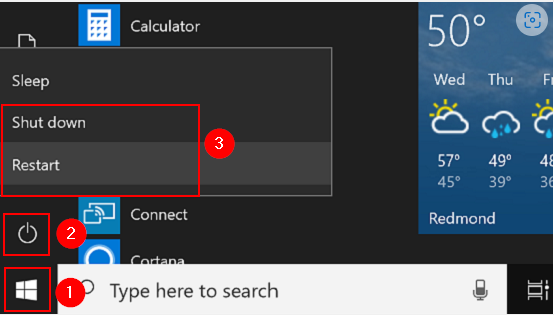
- or press and hold the power button for 15 seconds.
2. Clear Browser Cache
Clearing your browser cache (Chrome, Firefox, Safari, Edge, Internet Explorer, etc.) can improve browser performance by running faster and reducing loading speeds. Not all cache is bad cache or makes your computer slow! Cache is a great system that allows your apps, browser and computer to run optimally.
Steps to be performed: (NOTE: This process varies based on your web browser preference.)
- Mozilla Firefox

Click the menu on the toolbar > Settings > Privacy & Security > Under Cookies and Site Data, select clear data > Clear > Close and relaunch the browser.
- Internet Explorer
Click on the Settings wheel > internet Options > on the General Tab, under the browsing history category, select “Delete…” > Delete > Apply > Ok > Close and relaunch the browser.
- Google Chrome

Ellipses (3 dots) > Settings > Privacy and Security > Clear browsing data > Time range: All time > Clear data > Close and relaunch the browser.
- Microsoft Edge
Ellipses (3 dots) > Settings > Privacy, search and services > Clear browsing data now > Choose what to clear > Timeframe: All time > Choose applicable categories > Clear Now > Close and relaunch the browser.
3. Clear System Cache
When most users think of cache, they think of browser cache. However, cache exists outside of browsers as well, including your system cache and DNS cache
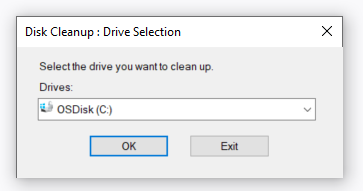
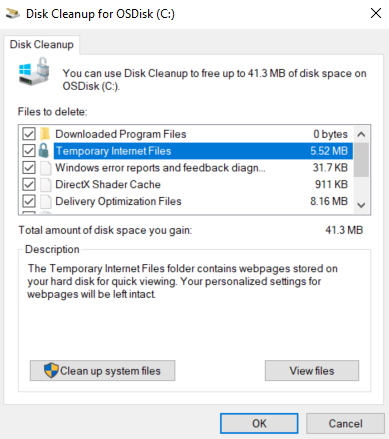
Run Disk Cleanup
- A Disk Cleanup helps free up space on your computer or “hard disk”, in return your operating system performance improves.
- To accomplish this, go to Start Menu > type “Disk Cleanup” > Select the drive that you want to clean (most of the time this is (c:) > OK > Select all checkboxes > Hit Ok > Delete Files
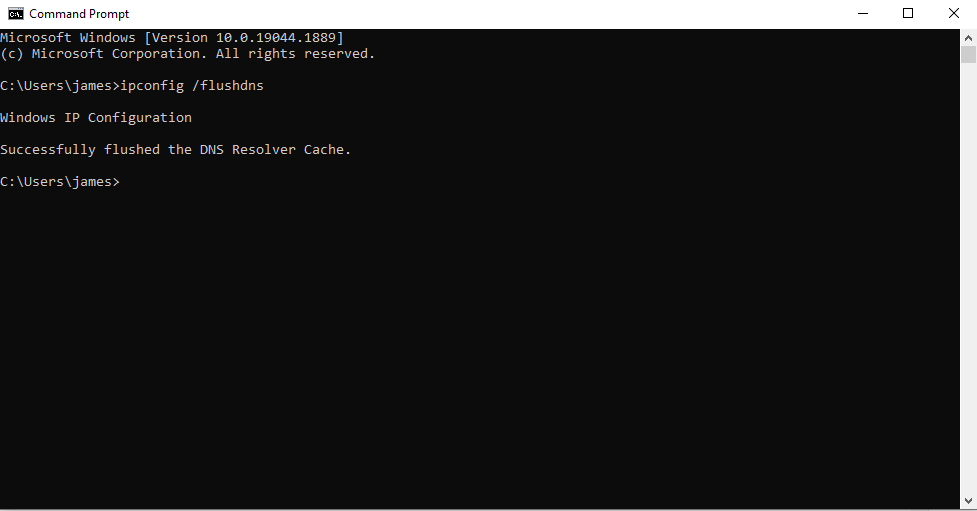
Clear DNS Cache
- Flushing your DNS will help with internet connectivity, security concerns and will clear out any bad connections cached in your system.
- To perform this, navigate to your Start Menu >type “cmd”. When the command prompt opens, type: “ipconfig /flushdns” on the command line > reboot the computer.
Run Disk Defrag
- A disk defrag optimizes your storage by consolidating files and rearranging fragmented data on your disk. Note: More and More computers have an SSD now instead of a Hard Drive. If you have an SSD, a disk defragment will not fix your issue.
- If you have a Hard Drive perform the following: Start Menu > type “Disk Defrag” > select “Defragment and Optimize Drives > Select the drive that you want to defragment (most of the time this is (c:) > Select Optimize.
4. Run a Repair on Effected Apps
Sometimes you may notice that a specific application is causing you grief. In that case, I would focus on that application. Obviously, try closing the application and restarting your computer outlined above. A reboot unfortunately does not fix all issues. Running a repair is relatively simple and can be performed by the steps below:
Windows 11: Navigate to your Start Menu > Settings> Apps > Apps & Features > Select the More icon (next to the app that is causing you issues) > Select Advanced Options or Modify > select Repair or Reset.
Windows 10: Navigate to your Start Menu > Settings> Apps > Apps & Features > Select the app that is causing you issues > Select Advanced Options or Modify> select Repair or Reset.
Repair via Control Panel: Navigate to your Start Menu > type ‘Control Panel’ > Select Programs > Programs & Features > Right-click on the app that you would like to fix > Select repair. If repair is not an option, select Change and follow the onscreen instructions.
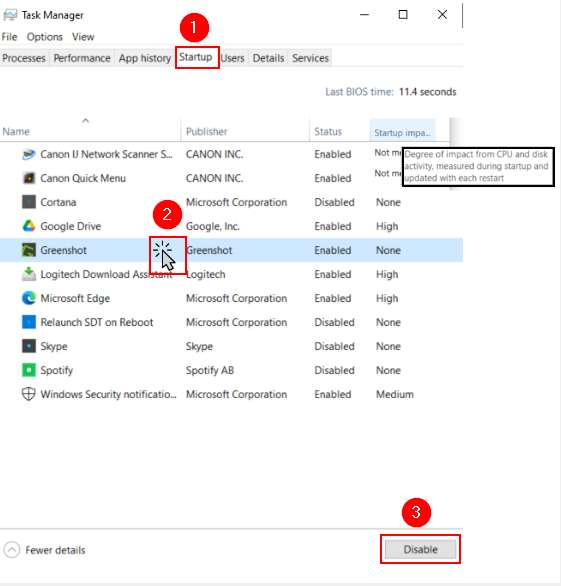
5. Remove Programs from Startup
- Remove programs from startup:
- If you are having an issue in which your computer is slow to start up, I recommend removing programs from your startup folder. This can be done in Windows 10 and Windows 11 by navigating to your Start Menu > type “Task Manager > Click on “Startup” tab > right-click on any application that should be removed > select disable.
6. Check for Malware
When handling malware it can be tricky, you want to make sure that you are not connected to the internet. If you are connected to the internet, the virus is able to mask itself.
Restart your computer into safe mode . For Windows 10: hold down the Shift key while you select Power > Restart
After your PC restarts, select Troubleshoot > Advanced options > Startup Settings > Restart
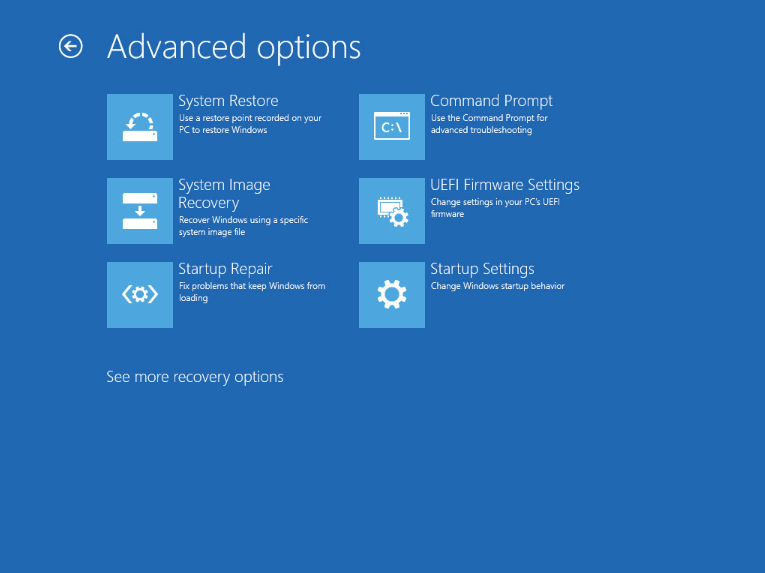
After your PC restarts, press F4 to start your PC in Safe Mode.
NOTE: can also boot from recovery media stored on a USB drive. But, I recommend letting a professional complete this.
Run your preferred software to fight malware (Avast, cCleaner, Malwarebytes)

Once completed, reboot your computer.
If you are still having issues, consult with a local computer repair
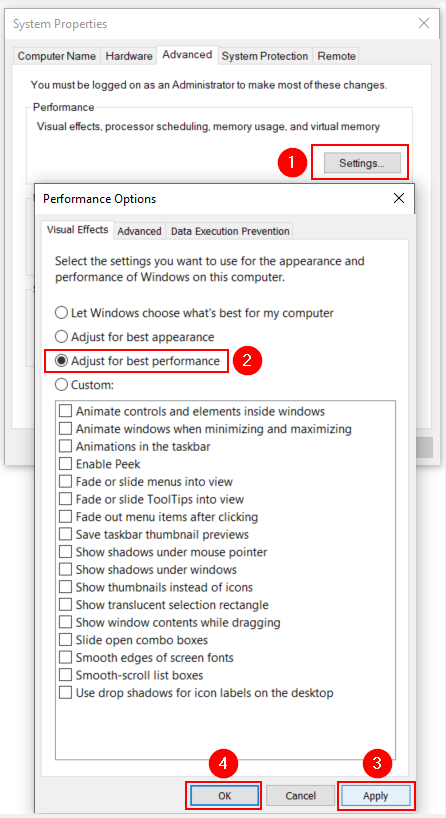
7. Adjust for best performance
Have you ever noticed the crystal clear view of Windows with remarkable color themes and straight lines throughout the Operating System? Well this all takes up processes in your pc and can cause your pc to run slower. To adjust your pc for best performance, try the following.
Navigate to your Start Menu > Type “System Properties” > Select “Advanced System Settings” > Click on “Settings” under Performance > Select “Adjust for best performance” > Apply > OK.
Still having issues?
Unable to fix your computer slowness issue on your own? Tindall Tech is here to support you!
No matter how big or small your computer issue is, we will gladly take a look and either come to you or login remotely to help!
Give us a call at 816-548-8198 or submit your inquiry here.

Be the first to comment